Sidebar
User's Manual
Table of Contents
Uncharted 4 Gamepack

Loading the Gamepack
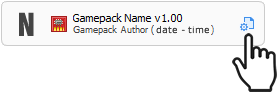
To load an Gamepack into the Titan Two, simple drag-and-drop the Gamepack icon box from the Online Resources to any Memory Slot in the Gtuner's Device Memory Slots pane.

| If the Memory Slot is not empty, its content will be overwritten. |
After the drag-and-drop process, the Memory Slot should show the Gamepack name, version, author and the date/time it was loaded in the Memory Slot.
Using the Gamepack
After load the Gamepack into the Titan Two, press the right button on the device until the display shows the same number of the Memory Slot the Gamepack was dropped. The Player 4 LED (Purple) indicates the Gamepack is running.
Runtime Operation: Press [Touch-Click|View] + [CROSS|A] to quickly enable/disable the Gamepack without unload the Memory Slot. The controller will vibrate once to indicate the Gamepack is disabled, and twice to indicate the Gamepack is enabled. |
Configuring the Gamepack
After drag-and-drop the Gamepack to any Memory Slot, click on the configuration icon to open the Interactive Configuration Interface.
The Interactive Configuration Interface contains all MODs available on the Gamepack. By default all available MODs are disabled. The following instructions explains how to enable and configure each available MOD.
FIRE MODE ACTIVATION
Select and configure automated actions to be executed when the Fire button is pressed. Examples of automated actions are Rapidfire, Jitter, Anti-Recoil, Fire Hair-Trigger, Easy Akimbo. The Primary and Secondary fire mode sub-sections lists all fire actions available on this Gamepack.
Runtime Operation: Press [Touch-Click|View] + [Fire Button] to toggle on/off the selected Fire Mode. The controller will vibrate once to indicate the Fire Mode is disabled, and twice to indicate the Fire Mode is enabled. |
Fire Mode Activation:
Select when the Primary and Secondary fire mode should be activated.
- Activated on fire trigger
The selected Fire Mode is activated when the Fire button is pressed. - Activated on fire trigger and ADS(Scope)
The selected Fire Mode is activated when both the Fire and the ADS(Scope) buttons are pressed. - Activated on fire trigger and not ADS(Scope)
The selected Fire Mode is activated when the Fire button is pressed, but the ADS(Scope) button is not. - Activated on full press fire trigger
The selected Fire Mode is activated only if the Fire button, usually a controller trigger, is totally pressed down.
PRIMARY FIRE MODE
If enabled, the Primary Fire Mode is selected by pressing D-Pad Right and activated when the Fire Mode Activation condition is met. The available fire modes in this Gamepack are:
- Simple Rapidfire
This Fire Mode does not requires any extra configuration, the fire button is automatically pressed and released very quickly. Indicated for semi-automatic weapons, specially hand guns. - Advanced Rapidfire
This Fire Mode allows full customization of many parameters of the rapidfire, such as how fast the fire button should be pressed, force a delay between the first and subsequent shots and auto stop after an determined number of shots. Read the “Advanced Rapidfire Configuration” sub-section for more details.
Advanced Rapidfire Configuration:
Configure the parameters of the Fire Mode Advanced Rapidfire. The parameters Hold time and Release time are complementary and together defines how fast the fire button should be pressed.
- Hold time (ms)
This parameter sets for how long, in milli-seconds, the fire button should be kept pressed in the rapidfire cycle. For fully-automatic weapons, this time also defines how many shots will be fired per each rapidfire cycle. - Release time (ms)
This parameter defines the time to wait, in milli-seconds, before the fire button should be pressed again, repeating the rapidfire cycle. - First to second shot delay (ms)
The recoil of some weapons can be much stronger on the first fired shot. This parameter adds an extra delay between the first and second fired shots to help better control the recoil, which can be very useful when used in conjunction with the Anti-Recoil MOD. - Number of shots (burst fire)
Configure how many rapidfire cycles should run until the fire button is pressed again on the controller. This parameter can convert fully-automatic weapons in semi-automatic single or burst, as well as semi-automatic-single weapons in semi-automatic-burst.
Anti-Recoil:
The anti-recoil automatically pull-down the aiming stick to oppose the weapon recoil while firing. The required pull-down force varies accordingly the weapon in use and can be configured using the “Anti-recoil vertical pull force compensation” parameter.
| The Anti-Recoil is also affected by the Fire Mode Activation condition. |
- Enabled
This option enables the anti-recoil independently of the selected Fire Mode and will apply the pull-down force wherever the Fire Mode Activation condition is met. - Active on hold time (Advanced Rapidfire)
This anti-recoil option works in conjunction with the Advanced Rapidfire. The pull-down force is applied only during the hold time of the rapidfire cycle. - Active on release time (Advanced Rapidfire)
This anti-recoil option works in conjunction with the Advanced Rapidfire. The pull-down force is applied only during the release time of the rapidfire cycle.
Anti-recoil vertical pull force compensation
Configure the force of the anti-recoil pull-down. The value can go from 0.00 to 100.00, where 0.00 have no effect and 100.00 is equivalent to pull the aiming stick all the way down. Normally values between 20.00 and 45.00, depending of the weapon in use, are enough to counter the recoil.
| Set negative values when using inverted vertical aiming. |
Fire Hair-Trigger:
The fire hair-trigger drastically increases the sensitivity of the fire trigger button. This has become more relevant as the game developers started to apply deadzone to the trigger buttons, requiring the player to pull the trigger at least half way down for the action be registered by the game.
| The Fire Hair-Trigger is also affected by the Fire Mode Activation condition. |
SECONDARY FIRE MODE
If enabled, the Secondary Fire Mode is selected by pressing D-Pad Left and activated when the Fire Mode Activation condition is met.
| The configurations of the Secondary Fire Mode are exactly the same as the Primary Fire Mode. Refer to the Primary Fire Mode section for more details. |
SHOT ACTION
Choose an extra action to be automatically executed when the selected condition is met.
- Strafe Shot on full press fire trigger
Automatically move left-right when the Fire button is totally pressed down. - Strafe Shot on fire trigger and ADS(Scope)
Automatically move left-right when both the Fire button and the ADS(Scope) button are pressed. - Strafe Shot on fire trigger and not ADS(Scope)
Automatically move left-right when the Fire button is pressed, but the ADS(Scope) button is not.
SCOPE MODE
Similarly to Fire Mode, the Scope Mode sets automated actions to be executed when the ADS(Scope) button is pressed. Examples of automated actions are Quick-Scope, Auto Aim, Auto Hold Breath, ADS(Scope) Hair-Trigger. This sub-section lists all scope actions available on this Gamepack.
Auto Aim (Aim Abuse):
- Auto Aim (Aim Abuse) on ADS(Scope) trigger
Activate aim-assist abuse when the ADS(Scope) button is pressed. - Auto Aim (Aim Abuse) on full press ADS(Scope) trigger
Activate aim-assist abuse when the ADS(Scope) button is totally pressed down.
Auto Aim Hold Time
Configure the time period, in milli-seconds, of which the ADS(Scope) button should be pressed when the aim-assist abuse is activated.
Auto Aim Release Time
Configure the time period, in milli-seconds, of which the ADS(Scope) button should be released when the aim-assist abuse is activated.
Auto Zoom:
The Auto Zoom automatically enters in “scope zoomed” mode when the ADS(Scope) button is pressed, respecting the selected condition.
- Activated on ADS(Scope) trigger
The “zoom” action is activated as soon as the ADS(Scope) button is pressed. - Activated on full press ADS(Scope) trigger
The “zoom” action is activated only when the ADS(Scope) button is totally pressed down.
ADS(Scope) Hair-Trigger:
The ADS(Scope) hair-trigger drastically increases the sensitivity of the ADS(Scope) trigger button. This has become more relevant as the game developers started to apply deadzone to the trigger buttons, requiring the player to pull the trigger at least half way down for the action be registered by the game.
AUTO MARK ENEMY
The Auto Mark Enemy will automatically press the Mark button accordingly with selected option and configured time period.
- Full time active
Auto Mark Enemy is kept running all time. - Active on ADS(Scope)
The Auto Mark Enemy runs only while the ADS(Spot) button is pressed.
| In Campaign mode there is no extra requirement. In Multiplayer mode the booster “Marking” is required. |
Auto Mark Enemy Time Period:
Configure the time period, in milli-seconds, of which the Mark button should be automatically pressed.
TURBO MELEE
The Turbo Melee automate processes related with the melee action, including -when possible- processes that takes advantage of game glitches to decrease the time between attacks. The Turbo Melee options available on this Gamepack are:
- Regular turbo melee
Automatically press the Melee button very quickly, equivalent to the turbo mode found in many gaming controllers.
| Double-tap and hold the Melee button for actions that requires hold the button for an certain amount of time. |
TURBO PICKUP
Enable turbo mode on the pickup items button.
| Double-tap and hold the button for actions that requires hold the button for an certain amount of time. |
TURBO ROLL
Enable turbo mode on the roll button.
| Double-tap and hold the button for actions that requires hold the button for an certain amount of time. |
TURBO JUMP/CLIMB
Enable turbo mode on the jump/climb button.
| Double-tap and hold the button for actions that requires hold the button for an certain amount of time. |
BUTTON LAYOUT
Configure the Gamepack button layout exactly as the button layout set in the game settings.
| ATTENTION: If the button layout of the Gamepack does not matches the button layout of the game, the MODs may not work properly. |
L3 / R3 / X:
- Default
- Alternative 1
- Alternative 2
- Alternative 3
- Alternative 4
- Alternative 5
Sticks and Sticks While Aiming:
- Default
- Flipped
Shoulder Buttons Scheme:
- Default
- Legacy
- Sided
Shoulder Buttons Left and Right:
- Default
- Flipped