Sidebar
User's Manual
Table of Contents
Universal Gamepack
Loading the Gamepack
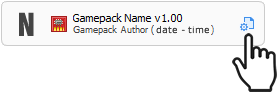
To load a Gamepack into the Titan Two, simple drag-and-drop the Gamepack icon box from the Online Resources to any Memory Slot in the Gtuner's Device Memory Slots pane.

| If the Memory Slot is not empty, its content will be overwritten. |
After the drag-and-drop process, the Memory Slot should show the Gamepack name, version, author and the date/time it was loaded in the Memory Slot.
Configuring the Gamepack
After drag-and-drop the Gamepack to any Memory Slot, click on the configuration icon to open the Interactive Configuration Interface.
The Interactive Configuration Interface contains all MODs available on the Gamepack. By default all available MODs are disabled. The following instructions explain how to enable and configure each available MOD.
INFO
The mods in this gamepack are made to be universal across a wide range of shooters. It is possible some of these mods are not compatible with your game.
FIRE MODE
In this section you can choose when anti-recoil or rapidfire is activated
- HIP
Activates specified mods on both HIP/ADS
- ADS
Activates specified mods on ADS+FIRE only.
RAPIDFIRE
This section is for customizing your rapidfire timings.
The Hold and Release times are needed for all RapidFire options.
If you're using the Advanced RapidFire option you will also need to configure First To Second Shot Delay and Number Of Shots (Burst Fire)
- First to second shot delay (ms)
The recoil of some weapons can be much stronger on the first fired shot. This parameter adds an extra delay between the first and second fired shots to help better control the recoil, which can be very useful when used in conjunction with the Anti-Recoil MOD.
- Number of shots (burst fire)
Configure how many rapidfire cycles should run until the fire button is pressed again on the controller. This parameter can convert fully-automatic weapons in semi-automatic single or burst, as well as semi-automatic-single weapons in semi-automatic-burst.
The default hold and release times are recommended for most games.
ANTI RECOIL
The anti-recoil automatically pulls the aiming stick to oppose the weapon recoil while firing. The required pull force varies accordingly the weapon in use and can be configured using the “Vertical or Horizontal” parameter in the profiles section.
There are 8 different Anti-Recoils to choose from and it comes down to personal preference so try them all.
The first 6 work for controllers or XIM.
Mouse (Raw Offset) can only be used if your mouse is directly plugged in to the Titan Two.
Computer Vision (Apex Legends) requires you have setup computer vision (guide on forums) and have the Apex Legends CV script in your working directory.
Rumble Activation
Automatically start/stop the anti recoil function.
- Disabled
Rumble activation is disabled. Anti-recoil will activate instantly on Fire Mode trigger press.
- Start on rumble
Anti-recoil will be activated when Fire Mode is pressed and rumble is detected. The anti recoil will stop when the trigger is released.
- Stop on rumble
Anti-recoil will be activated when Fire Mode is pressed. The anti recoil will stop when no rumble is detected.
- Start/stop on rumble
Anti-recoil will be activated when Fire Mode is pressed and rumble is detected. When no rumble is detected the anti-recoil will stop.
Deadzone Compensation
The following Anti-Recoils require your games actual deadzone to be set (not your in game setting deadzone) and work best with XIM.
- V2 Polar - Dont@Me
- DrNefario (Latest)
- J2Kbr DZ Compensation
Deadzone Shape
- J2Kbr DZ Compensation
This Anti-Recoil also requires the deadzone shape to be set.
PROFILE SELECTOR
Here you can setup your profile button combo or keys to switch between profiles. The color next to each profile is the color the LED will display on the device.
You can leave them default, customize them or set them to disabled.
- Button[1]
The button you want to hold.
- Button[2]
The button you want to tap.
- Key
Select a single key to switch profiles.
PROFILES:
In this section of the interactive configuration you can find profiles 1-4 to set custom Anti-Recoil values for different weapons and various other mods listed below.
The Anti-Recoil can use single vertical / horizontal values or two stage with timeout for even more control with your weapon.
- Vertical
This value helps pull downwards on your weapon.
- Horizontal
This value can be negative (to the left) or positive (to the right)
- Vertical Timeout
The time before the second vertical value kicks in.
- Horizontal Timeout
The time before the second horizontal value kicks in.
- Reduce HIP
Some games apply less recoil when firing from the HIP. You can enter a percentage from 0-100% and this will be reduced from your current anti-recoil profile values every time you HIP fire.
- Reduce Crouch
The same as Reduce HIP, but for games that apply lower recoil values when crouched.
- Reduce Prone
The same as Reduce Crouch, for games that apply lower recoil values when prone.
- Secondary Weapon Profile
Here you can select a profile to be activated when you switch weapons with Y or Triangle. When switching weapons the device display will show “P” for primary weapon and “S” for secondary weapon. If your weapon tracking gets messed up or you die and are back to your primary weapon you can reset the tracking by holding the left trigger (ADS) and double tapping the right stick (or whatever keys you have mapped these buttons to)
* Action HIP & Action ADS
Here you can select an action to be performed on HIP and or ADS
* Action HIP Time & Action ADS Time
If you selected strafe the time determines how wide you move. For all other options this is the time before the action is performed where 0 is instant.
* Rapidfire
Here you can select the type of rapidfire option you would like to use.
* Aim Assist
There are three options to choose from and it comes down to personal preference.
* Quickscope
Quick-Scope is usually used with one-shot kill sniper rifles. This MOD automatically executes the action of ADS (“Aiming Down the Sights”), hold-breath and finally fire at the configured time. This technique is particularly effective on consoles due to the aim assist that tends to pull the crosshairs towards an enemy when starting to ADS.
* Auto Reload
This option will automatically press the X or SQUARE button when the release condition of FIRE / ADS is met.
AIM ASSIST
If you have enabled aim assist in any of your profiles you can set the strength here. A higher value does not mean stronger aim assist. You want to set the right stick value slightly above your deadzone, the left stick can go higher.
Note: Orbital does not shake the screen like other aim assist mods and you may need to increase the stick noise option at the bottom of the interactive configuration. To verify if orbital is working correctly open Gtuner's device monitor and hold your left trigger you should see right stick x / y moving.
The aim assist switches from the left to right stick depending if the necessary variables are met in return this will give you the most aim assist possible.
SCOPE MODE
ADS Options:
- Disabled
All scope options are disabled.
- Auto ADS
When the fire trigger is pressed the scope (ADS) will automatically be pressed for you.
- Toggle ADS
The scope (ADS) trigger once tapped will stay scoped until you tap the trigger again to release it.
Hold Breath Button:
Automatically perform the “hold breath” action when the selected hold breath button is pressed.
* Disabled
Auto hold breath will not be activated.
Quick-Scope Timing(ms)
If you have selected the quick scope option in one of your profiles you can customize the sniper timing here.
Sets the time, in milliseconds, to wait before firing. The Quick-Scope timing must be set accordingly the weapon in use to perfect the accuracy.
AUTO SPOT
Auto Spot Time
The spot/tag button will be automatically pressed every x milliseconds.
Auto Spot Button
Select your in game spot/tag button.
* Disabled
Auto spot will not be activated.
GRENADE OVERCOOK
Grenade Overcook Time
Configure the time in milliseconds based on how long it takes for your grenade to explode. The grenade will then automatically be thrown for you.
Grenade Button
Select your in game grenade throw button.
* Disabled
Grenade overcook will not be activated.
RELOAD CANCEL:
For games that allow reload canceling. Automatically cancel the reload once the fire trigger is pressed.
Set the reload time (in ms) to the highest reload time out of the weapons you use. Ex: My SMG reloads in 2 seconds so I would set 2000ms.
TRIGGERS:
Hair-Triggers
The hair-trigger drastically increases the sensitivity of the fire and ads trigger buttons. This has become more relevant as the game developers started to apply deadzone to the trigger buttons, requiring the player to pull the trigger at least halfway down for the action to be registered by the game.
Flip-Triggers
Flip-Triggers will swap your left and right triggers with the bumpers, you should set this option here and not in your game settings.
MISC
Easy Sprint
Easy Sprint attaches the sprint action to the stick movement, avoiding the need to press the Sprint button repetitively.
- Activated on move stick 50% forward
Start sprinting as soon as the movement stick is pushed 50% forward.
- Activated on move stick 90% forward
Start sprinting when the movement stick is pushed 90% forward.
- Activated on double tap stick forward
Start sprinting by double-tapping the movement stick forward.
- While ADS is deactivated
Will only sprint when the ADS trigger is not held.
Turbo Melee Button
Turbo Melee executes the melee action repeatedly, Turbo Melee also automates -when possible- processes that take advantage of in-game glitches to decrease the time between attacks.
Select your in game melee button or set it to disabled.
Rapidfire Key
Quickly enable or disable rapidfire when a rapidfire option is selected in your profiles.
Turn Boost Key
For MnK users who need an extra boost when landing in battle royale games or turning in vehicles.
STICK DRIFT
If your controller sticks (left or right) drift on there own slowly increase the slider until they no longer move without any input.